Tag: construction

Concrete manufacture and testing

Concrete manufacture and testing

I observed the testing of concrete intended for the headhouses of London Power Tunnels 2. This took place at the batching plant Capital Concrete in east London.

There are two types of concrete batching: wet mixes and dry mixes. The former can generally produce a higher quality concrete because it can be mixed using the industrial-scale mixers at the batching plant, rather than smaller mixers available on construction sites. Today, a wet mix is being prepared for the concrete slab. The intended strength is C40/50 (meaning a failure strength of 50MPa on a 5cm x 5cm x 5cm cube).

Note on sustainability. Concrete production is one of the world’s largest sources of CO2 pollution, meaning civil engineers need to come up with alternatives which are less polluting. In normal concrete, which is based on Portland cement, about 1000kg of CO2 is produced per tonne of concrete. A new technology called Earth Friendly Concrete (EFC) is capable of reducing this to about 200kg CO2 per tonne of concrete – a significant improvement – by replacing the Portland cement with Ground Granualted Blast Furnace Slag (GGBS) and waste fly ash from industry. The concept is in its infancy so its properties can be unpredictable – previous batches have not reached the required strength because of low-quality fly ash supplied from Dunkirk in France; now that the supplier has been changed, today’s mix should pass the required tests. If the rollout of EFC on this large project is successful, it could be a significant turning point for the construction industry to reduce its emmisions from concrete production.

The batch for testing is a sacrificial batch – it will not be sent directly to the project, but if test mix passes the strength tests, the same mix will be used on the project.

Layout of the plant:

  • Silos storing cement (or Earth Friendly cement alternative)
  • Aggregate storage area
  • Huge industrial concrete mixer, with a ‘tap’ to transfer the mix straigh into mixing lorries for transport to site
^ The giant, industrial concrete mixer at the batching plant.

Testing the batch:

1) Slump test. This is done every half an hour for three hours. Concrete is filled into a conical mould and then the mould is removed so the mixture spreads into a heap. The change in height of the heap is the slump.

2) Bleed test. A cyclindrical container is filled with the concrete mix in five layers – between each layer a vibrating tool is used to ‘tamp’ the mixture and reduce air bubbles. In general, the way the concrete firms up is based on the water separating from the heavier particles over time until enough stiffness is achieved. The amount of water that forms at the top of the cylinder is the bleed; a lid prevents evaporated water from escaping from the test. The use of high proportions of GGBS results in a longer bleed time that conventional concrete but this can be reduced with fine aggregates (<50 micrometres). When bleed occurs on site, either the bleed water is remixed into the concrete (which may result in a weak top surface) or one can wait for the bleed water to evaporate. If the rate of evaporation is faster than the rate of bleed (e.g. on a very hot day), the concrete may experience plastic shrinkage, which is undesirable and should be avoided.

3) Cube tests. 5cm cubes are filled with the mix. They are tested, usually with a hydraulic machine, on days 1-7, day 14, 28, 56 and 96 for failure strength. Concrete gets stronger over time and the 28-day strength is usually the quoted value; the material must reach its target strength (here, 50 MPa) by that date to be acceptable.

4) Weight test. This is just a way of obtaining the concrete density, which is a vital parameter to consider for safe structural concrete design.

5) Beam test. A 3-point test (simple supports at the ends, and a point force applied at the middle) is taken on an unreinforced beam of concrete at 28 days. This tests the bending strength of the mix.

Creation of a simple beam bridge for road traffic

Creation of a simple beam bridge for road traffic

A beam bridge is the simplest type of bridge, consisting of a deck resting on vertical columns. Despite their simplistic physics and appearance, the construction of such a structure in the modern world takes more than just resting a plank on a column. I’ve made a short video showing an example of the construction process.

The main materials of interest are:

Reinforced soil. This is a specialist technique whereby the nearby soil is made stronger by the addition of a grid of a different material – usually metal or composite layers. This is a vital process in weak soils and is usually carried out by a specialist subcontractor on a big project.

U beams. The deck consists of these concrete beams, whose cross section is a U shape. This has a large second moment of area (see below for calculation), making the deck very resistant to torsional and bending stresses. The beams tend to be large enough that construction workers are able to stand inside them to attach the next layers of material.

Temporary works scaffolding. Usually consisting of metal bars which can be assembled and disassembled quickly, temporary works structures are needed to prop the structure up before all structural elements are completely secure.

Rebar. Rebar is a type of steel shaped into rods of about 2cm diameter. When worked into a cage shape and inserted during the concrete pour, the resulting ‘reinforced’ concrete, is much stronger in tension that its raw counterpart. This is because concrete tends to be strong in compression but not tension; using pure steel would be way too heavy, not to mention way too expensive. Combining these properties creates an excellent new material which is used in all large modern infrastructure projects.

Permadec plastic panelling. This is a very strong overlay material that is manufactured by a specialist company. It contains a shell of fibreglass with steel strips inside and is placed on top of the U-beams.

Composite top layer, consisting of some of the materials described above. This diagram is an expansion of the diagram of the U-beams above. It is a zoomed in version of the green box.


Calculation of the U-beam second moment of area:

We have to split the cross section up, calculate the value of I about the centroid of each section, then use the parallel axis theorem to find the total I about the centre of the section.

Rural alpine natural water system

Rural alpine natural water system

I visited a low-tech mountain hut during a walking tour in the Alps in France. At 1500m elevation, it can only be accessed via cable car and then a mountain walk, and it is isolated from both electricity and water networks. This means the only power comes from gas, used for cooking, and wood, burned for heating. Water must be obtained from a nearby stream, yet I found the system to be surprisingly sophisticated.

To check it out, I walked about a hundred metres from where the hut stands, to locate the stream. Basically, the system consists of two plastic tanks, each holding about 100 litres of water, sitting in the stream. Water enters the first tank directly from the stream – it is fresh as it has come straight from the glacier higher up. This tank contains a filter to catch any sediment; at present, this is improvised with an old stocking.

The water that passes through the filter is led via a plastic hose to the second tank, which is a couple of metres down into the valley and is a storage tank: when supply exceeds demand, some water can be held here until it is needed on drier days. An overspill pipe attached to the top allows water to run safely back into the stream if the tank is full.

The main pipe leads from the storage tank, downhill to the hut, where it can be used cold or heated with gas.

Some calculations for quantifying the system

We can examine two situations; the first, where the second is not in overspill so nothing flows through location 6; the second where it does. Bernoulli’s equation is useful here. It is an energy balance equation and states that [pressure + kinetic energy + gravitational potential energy] = constant in a flow system, as long as the mass flow rate is constant (there are a couple more technicalities, but I won’t dwell on them here). Bernoull’s equation allows us to consider only start and end point, ignoring what happens in between.

Where p is pressure, rho is density, v is velocity, g is gravitational acceleration and h is height from a fixed point.

Also, with a constant mass flow rate (and incompressible fluid) we can assume:

where A is pipe area.

Situation 1: At both 5 and 1, the density of the water is the same and the area of the pipe is the same. Therefore the velocity of the water entering the house is the same as the velocity of the water from the stream. To calculate the pressure change, we can cancel the second term in Bernoulli’s equation (since velocity and density don’t change), giving p1 + (rho)(g)(h1) = p2 + (rho)(g)(h2). Rearranging gives p2 = p1 – (rho)(g)(h1-h2).

Sticking into this that p1 = air pressure = 1 bar = 100kPa and h1-h2 = 30, p2 is 3.94 bar.

French alpine viaducts – the old and the new

French alpine viaducts – the old and the new

The A40 motorway in southern France is a busy highway through the mountains that provides the most direct route from Geneva to the mountain resort of Chamonix and surrounding towns. Together with a railways along a similar route, they are used all year round by both French and international tourists and local people; the area is famous for skiing, mountain hiking, climbing and local French culture – so the roads and railways along this route are essential.

Two prominent and impressive viaducts caught my eye as I drove down the motorway. For each, I sketched a front-on, fine-lined shape and a more visual sketch of what the bridges actually look like when you’re driving on the road.

First, a modern, slender concrete structure – the Viaduc des Egratz de Passy. This one is part of the westbound A40 motorway.

^ see the column cross sections at the bottom of the drawing

Viaduc des Egratz de Passy, 1981 (road)

  • The (presumably reinforced) concrete posts are generally rectangular, with their short side aligned with the length of the motorway, with one exception. The column on the right of the drawing above is hexagonal instead – the reason is not clear, but it may be required because of the harsh bend at that point on the structure.
  • The deck does not appear to be simply fixed straight on to the columns – at a glance, it looks like it is levitating slightly. This is probably because of the damping system between the deck and the columns. Allowing some small damped rocking, rather than rigidly fixing the two together, helps the structure deal with the vibrations of the road without sudden plastic collapse or fast fracture of the joints.

Second, a more traditional, heavier-weight arch design – clearly from a much older era – the Viaduc de Saint-Marie.

Viaduc de Saint-Marie, opening date unclear (rail)

  • Straight, sturdy columns form the bottom section. Semi-circular arches have been utilised for structural stability in the top section.
  • The main material is masonry – probably stone masonry by observation.
  • Arch bridges are excellent at dealing with the continuous vibrations of railway traffic without the need for external damping systems (which were likley not developed at the time of construction).
  • The project would have been advanced for its time, fitting in with such an uncertain landscape – not to mention massively expensive as it would have been build by human power alone. Impressive!
Rhodes House renovation – site tour, Oxford

Rhodes House renovation – site tour, Oxford

Rhodes House is a university building in the centre of Oxford, home to postgraduates on a type of scholarship. It contains residential areas as well as conference and teaching and learning spaces. Despite the building being less than 100 years old, its style is more historic, with a design by Sir Herbert Baker which is reminiscent of 1600s Europe – to match much of the city’s university architecture.

As a listed building, it’s vital that the architecture is well-preserved. The idea of the project was, as a lead engineer described, to make it appear as if nothing had changed once the project is complete: most of the updates will be made underground, including a new conference room and new accessible lifts.

The tasks:

1. Install a spiral staircase into the rotunda

This is the rotunda from the basement. The celing must be drilled to form a hole leading to the ground floor, in which the staircase will be installed. The other challenge is the removal of the support columns – the weight they are currently carrying is minimal but the remaining concrete must be strong enough to hold as a kind of cantilever from the outer walls. Calculations predict that reinforcements will not be required, but this could change as the project progresses.

2. Preserve the strong masonry columns in the basement as a structural component, and line them up with those on the floors above

The original columns are extremely robust and strong so will continue to be used to hold the basement structure up. They will be refined and re-covered for aesthetic appeal.

3. Extend the basement: to create a large conference space and fire exits

The basement is extended using exposed reinforced concrete. There has been specially selected insulation installed for heat regulation; the holes you can see link to the ventilation and air conditioning system. The arch is an effective support structure; it also provides natural lighting for the conference space.

4. Construct sixteen new residential rooms in an excavated space, whilst allowing natural light in.

The rooms are dug underground. As well as being a space-saving solution, this is excellent for energy efficiency because the earth covering the rooms is a thick insulator, keeping rooms cool in the summer and warm in the winter. Spaces are fronted with solid oak doors and triple-glazed, full length windows; the walkway will be lined with trees down the middle to provide privacy.

5. Create a new outdoor social area

Above is the space where the social area will be – clearly, there is still work to do! On the left is a diagram of the small cafe structure, which will be used during events and conferences. I drew it out to try and visualise what had been explained by the lead engineer. Essentially a process called steam-bending will form timber into the right shape. This material takes the weight of the structure, which will be about four metres high. Weatherproof structural glass will be arranged in a facade around the edge, taking no weight but providing shelter from the weather on rainy, windy or cold days.

A journey in Icelandic churches: photo essay

A journey in Icelandic churches: photo essay

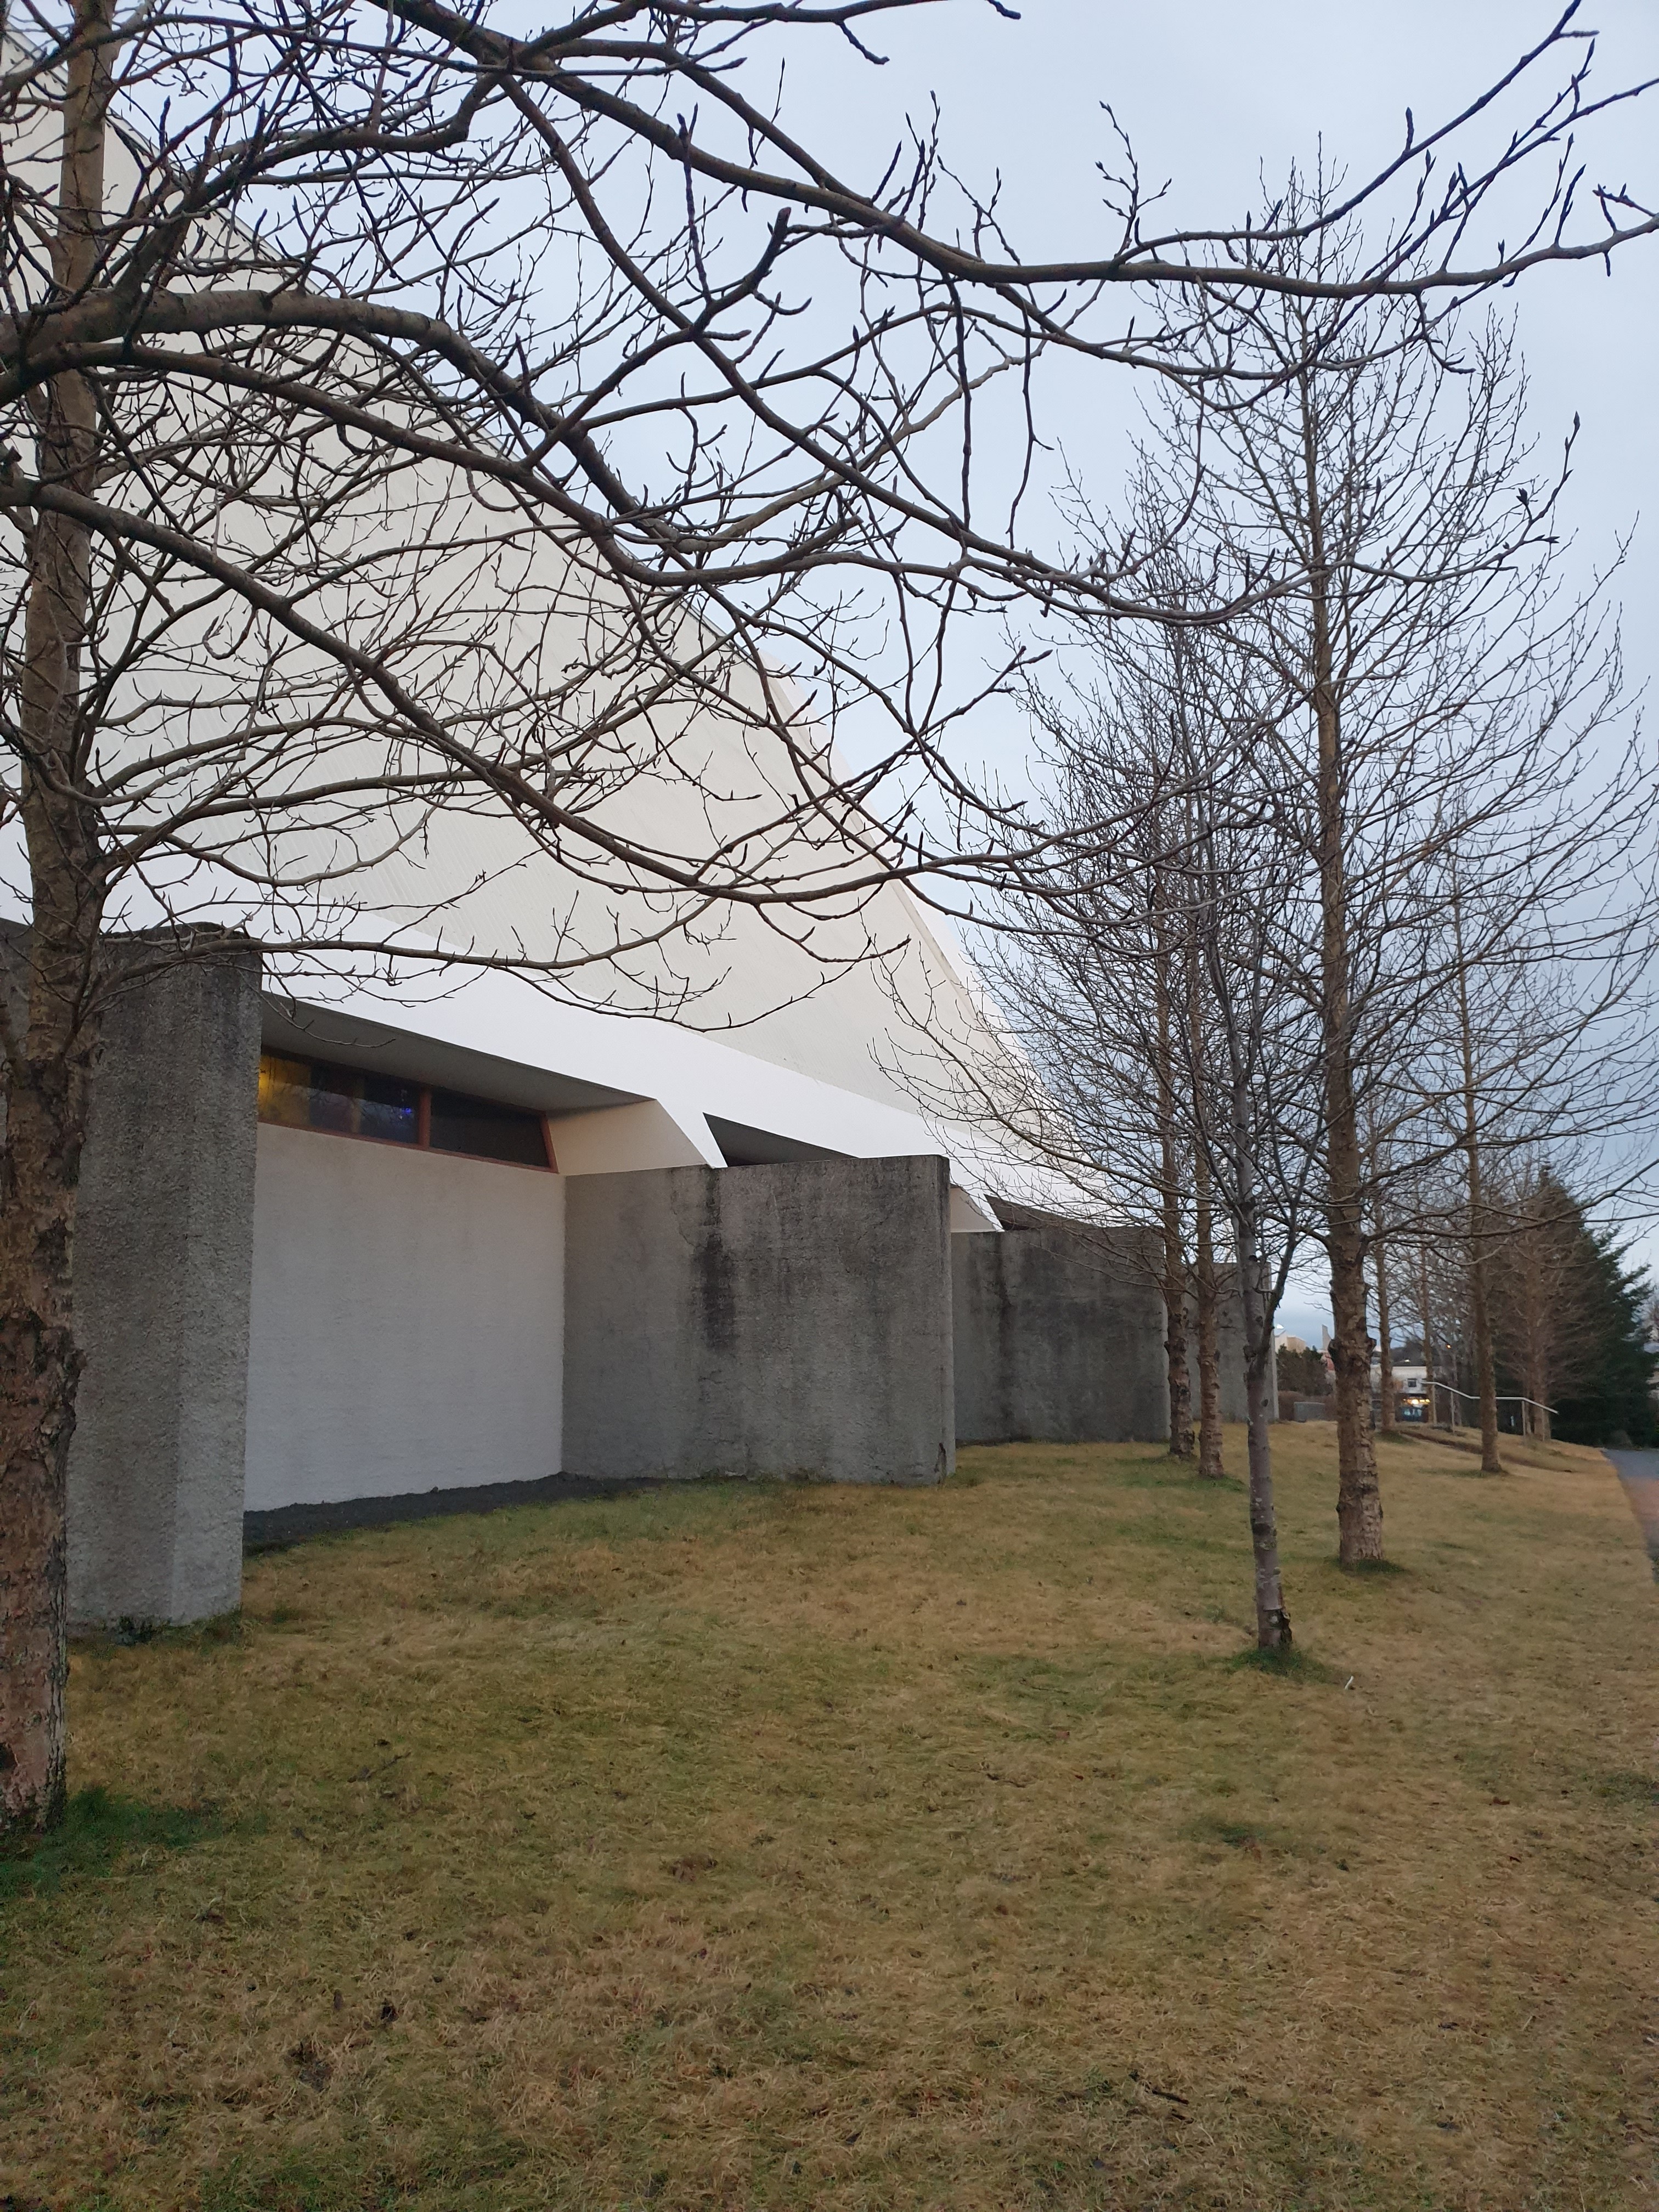
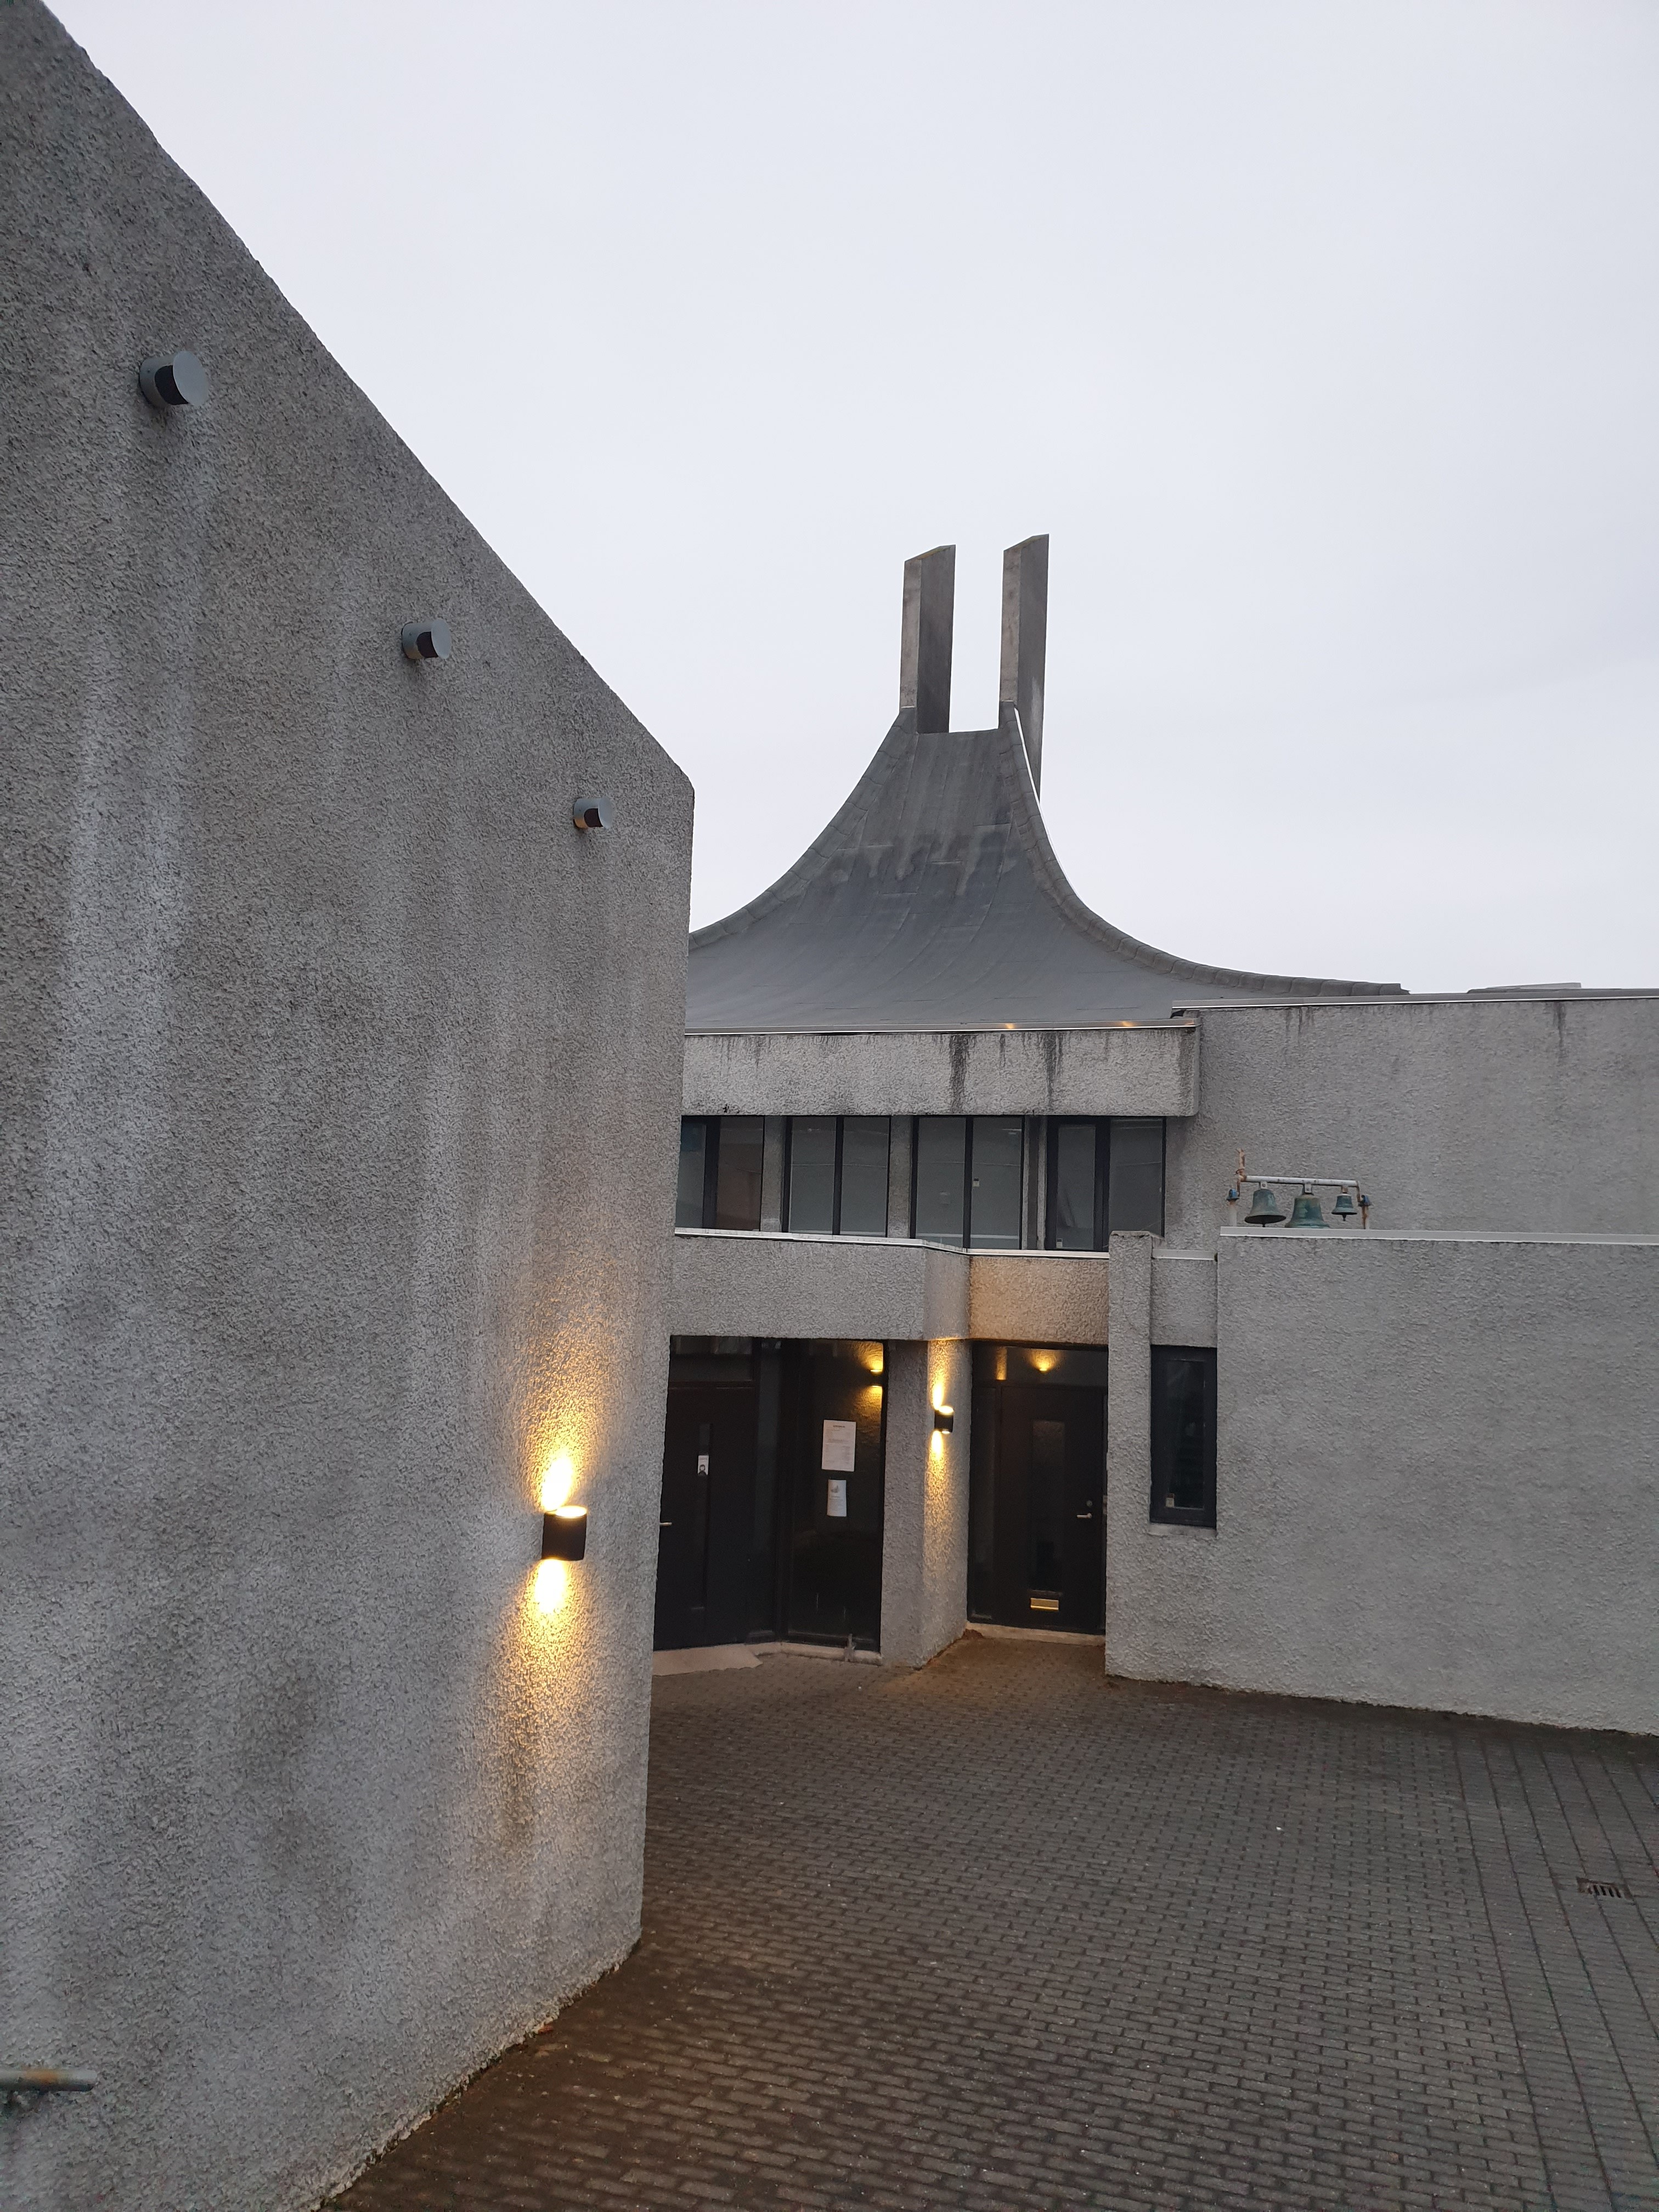
Wandering around Keflavik, the airport town of Reykjavik, Iceland, with the arctic wind whipping in my face and the sound of crashing waves behind me in the darkness, I came across an eerie, towering white building, like an huge spike amidst the squat shops and houses in the town. I walked closer – it was a church. I walked around it: gigantic white arms stuck out from the main building into the park and the place was lit up by purple light. I found it very mystifying and beautiful.

The reason I was taken aback by such a building was that it was so unexpected. I thought nordic Iceland would have almost exclusively traditional, cosy-looking churches, especially in a town other than the capital. Here’s the church:

Ytri-Njarðvíkurkirkja

On further research, I found out there are lots of unique churches in both Keflavik, as well as in Reykjavik. I made a note of the ones I wanted to see. A guide book explained that often, Icelandic architects-in-training had to go to another country to study before an architecture school was established in such a small nation. When these people returned home from Denmark, Germany, Italy, the US and more, Iceland became a melting pot of styles and influences, therefore producing a number of unique buildings.

The other point is that Icelanders are very in-touch with nature, and their buildings reflect that. (Reykjavik, although housing more than half the country’s population, is not a large city, so you’re never far from the countryside.) Often, the churches stick up out of the ground mimicking the mountains, rockfalls, volcanoes and waterfalls of the natural landscape of the country.

I put together a little church tour in Reykjavik and Keflavik, and this photo series shows those I explored.

Keflavíkurkirkja

Reykjavik Cathedral

Langholtskirkja

Askirkja

Laugarneskirkja

Kirkja óháða safnaðarins

Hateigskirkja

Hallgrimskirkja

Frikirkjan i Reykjavik

Landakotskirja

Seltjarneskirja

The churches definitely cover a huge range of styles and designs,. I enjoyed the beauty of each one. Some key points to note that unite them, though:

  • Lack of glass, especially as other European churches often indulge in large stained glass windows. This may be related to Iceland’s climate – glass is not a very good insulator, and can also be fragile, which makes it difficult to protect against blizzards.
  • Concrete designs that take inspiration from the surrounding landscape – huge towering rocks and vast sea
  • Use of corrugated iron. In most other countries, this material is used exclusively for non-aesthetic purposes, such as for industrial buildings or warehouses. Yet here its strength against the wind, rain, snow and ice has been embraced by Icelandic architects and engineers to their advantage (the ridges are placed vertically so that water runs off).
LPT2: more TBM insight

LPT2: more TBM insight

As the project progresses, the length of the tunnel increases and there is more space to walk along the inside of the TBM to complete various jobs. Currently, about 70m of tunnel has been excavated. Inside, it looks like a long, slightly mucky corridor:

When you reach the cabin and boring head, it gets more interesting. In general whilst drilling is taking place, two workers are required in this area.

  1. TBM driver. They sit in the small cabin and steer the path of the TBM and mechanical arms via various levers and buttons. They can see what is happening at the very front via a screen connected to a camera.
  2. Someone to watch the placement of the concrete rings. They stand in front of the cabin, where the rings are transferred through, and instruct the TBM driver where the next ring must be placed through a microphone. This can be as simple as, for example, ‘left a bit, down, stop’.

Each concrete ring weighs about a tonne and is approximately 1.2m long.

LPT2: use of TBMs

LPT2: use of TBMs

Use of a TBM, or tunnel boring machine, is essential to the success of such large-scale, 21st century tunnelling projects. Interestingly, they are a relatively new technology and hand-mining techniques were still in use for tunnel excavations in the UK in the last 50 years.

The machine consists of gantries, or functional sections (which can include electrical gantries, motor gantries and more), and can total 200m in length. This results in one major problem: how can the machine be used before enough tunnel length has been bored for it to even fit in?

  • The solution is that only one gantry needs to begin in the shaft. The rest remain on the surface, but are connected to the first via a series of ‘umbilical cords’ running down the shaft wall. As drilling progresses, more gantries can be inserted into the tunnel using a crane lift.
^ the structure of the TBM and the two shafts at New Cross can be seen in my sketch here. At this level of progression, only the western TBM has been inserted, with much of it still sitting above ground

The final length of the TBM is about 400m. Once the western TBM is fully inserted, the eastern one will begin a similar process. We are drilling in both directions because this site is the midpoint of the project.

The TBMs are given names; a bit like ships, they tend to be female. Ours above has been named Edith!

LPT2: high voltage power cable structure

LPT2: high voltage power cable structure

^ diagram of cable cross section

These thick cables are about 150mm in diameter and carry a high-voltage current way down the power tunnels that extend through south London. They are similar in design to those carried by power lines that stretch across the countryside. High voltage, but low current, results in minimal power loss and overheating.

Six cables run through the tunnel, as part of two circuit systems.

The total tunnelling length is about 32km, which means about 200km of cables must be installed during the project. This requires heavy lifting machinery, with the cables weighing about 50kg per metre.

Installation of cables will be via a monorail that runs along the tunnel ceiling.

LPT2: more on reinforced concrete

LPT2: more on reinforced concrete

The tunnels at London Power Tunnels 2 use a spray of reinforced concrete to stabilise the lining whilst thick concrete rings are inserted.

The material chosen consists of cement, sand, and steel fibre reinforcements. . I imagined these to be thin and easily bent, but on inspection of the sprayed wall in the tunnel I saw they were firm: of about 1mm diameter, hard and spiky. Although you might expect the spray to form a smooth-ish façade on the inside of the tunnel, in fact it is very rough-looking, with spikes of steel fibre.

^^ the fibre-reinforced concrete façade; you can see the size of the steel fibres against my hand